14. July 2022 By Alexander Zielinski
Add functions to MS Planner via MS Power Automate – part 2
In the first part of my blog post on recurring tasks in Planner, I showed you how to set them up. A number of special connectors were used here, which are very user-friendly and each designed for a specific purpose.
If the requirements go beyond the intended use, it is worth taking a look at Microsoft Graph API in combination with the http connector available in Power Automate. This would be the case when adding and/or changing categories of a Planner task. The default connector can set the task, but a check expression is needed for each of the current 25 categories. Furthermore, changes will need to be made if Microsoft introduces additional categories. The Graph API and http connector take a long time to set up, which is one reason not to use them. In addition, changes need to be made in Azure AD, which can prove difficult in larger organisations. In that respect, it would not be wrong to say that the solution is somewhat over-engineered for this particular use case. That said, the Graph API is a very powerful tool. It can be deployed together with Power Automate similar to how it has been used in the description below, which means that the solution has tremendous potential in terms of reuse. In my opinion, a concrete, comparatively simple use case is more suitable for explaining the interaction of the two components than a more abstract and/or more complex use case.
Adding categories to tasks
The True value can be set individually for each of the currently 25 categories in the Create task connector if the category is to be used for the task. This structure is a relic of IT systems from the 1990s, both in terms of data and controls. To effectively resolve this issue, I use the Microsoft Graph API in combination with the http connector. Certain requirements need to be met if you wish to go this route:
- A new app must be registered in Azure AD and permissions granted for the APIs that are needed.
- An app secret must be created in Azure AD and the data must be saved in the preferred password app when it is created (access to this data is no longer available after this).
- A user account must be created in AD and entered as the owner in the app registration. The reason for this is that the Graph API that is needed does not currently support the Application permission type, which is why a user account is required.
To recreate this flow, feel free to replace the connectors for creating and modifying the Planner task with the http connector. In this case, the categories are also assigned when the task is created. To test and explore the Graph API, Microsoft offers the Graph Explorer at https://developer.microsoft.com/en-us/graph/graph-explorer. The Graph Explorer helps you in particular with setting up the requests and processing the response.
Establishing the necessary conditions
Changes to the flow and the SharePoint list
SharePoint attribute
| Attribute | Type | Meaning |
| Categories | Text field, multi-line | Categories, separated by a line break (category name, consisting of ‘category’ + number) |
Additional flow variables:
| Flow-Variable | Type | Meaning |
| CategoryItems | Array | Array for categories |
| ClientSecret | String | ClientSecret String Client secret of the app in AD for http request |
| Username | String | AD user for http request |
| Password | String | Password of the AD user |
Register app in Azure AD
A new app is created in the AD and its client ID is is stored temporarily; the secrets should be stored in the password manager where possible. The API permissions ‘Group.ReadWrite.All’, ‘Task.ReadWrite’ and ‘User.Read’ are assigned.
Using the http connector
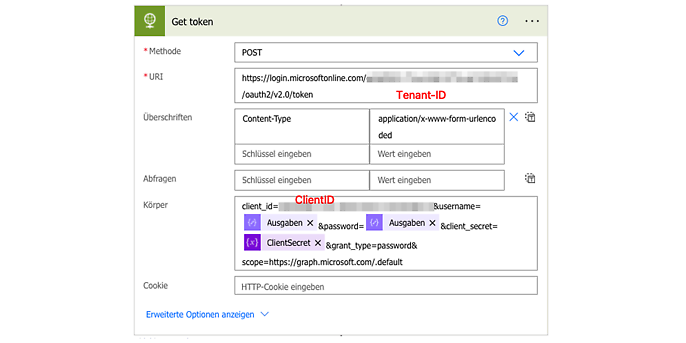
To use the http connector together with the Graph API, you will first need an access token. I get the access token before the first loop starts. The http connector is needed for the access token. After that, the token is extracted from the JSON that was received:

Token
Copy the following parameter string:
client_id=<<ClientID>>&username=@{outputs('Username')}&password=@{outputs('Password')}&client_secret=@{variables('ClientSecret')}&grant_type=password&scope=https://graph.microsoft.com/.default
The JSON is converted into flow variables by means of the Analyse JSON connector with the following schema:
		{
		 "type": "object",
		 "properties": {
		 "token_type": {
		 "type": "string"
		 },
		 "scope": {
		 "type": "string"
		 },
		 "expires_in": {
		 "type": "integer"
		 },
		 "ext_expires_in": {
		 "type": "integer"
		 },
		 "access_token": {
		 "type": "string"
		 },
		 "refresh_token": {
		 "type": "string"
		 }
		}
		}
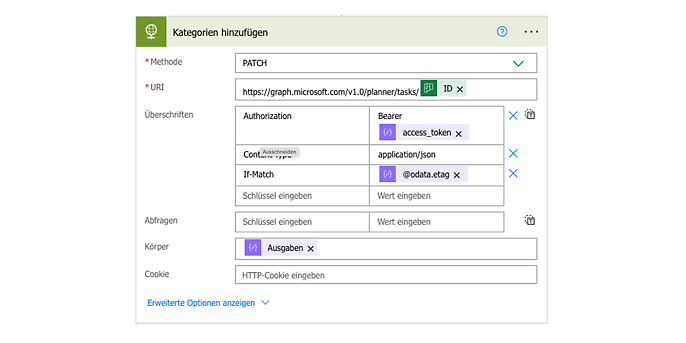
In my example, I use the patch method to update the Planner task together with the categories. If you wish to use the patch method, you will need the etag of the Planner task for the request header. To obtain this, a Get is first sent to the Planner task at the following URL:
https://graph.microsoft.com/v1.0/planner/tasks/<TASKID>. The TaskID is obtained from the task creation operation. A header containing the following information is required for the request: Key: Authorization; Value: Bearer <ACCESS_TOKEN>
The response is again a JSON, which means that the tag must be extracted. To this end, the pre-linked Analyse JSON connector with the following schema is used:
		{
		"properties": {
		"@@odata.etag": {
		 "type": "string"
		 }
		 },
		 "type": "object"
		}
I then transfer the contents of the SharePoint attribute Categories into an array, as I would with the checklist entries. Since a JSON is needed for setting the categories, I promptly enter: "ready" into the array – value of the connector: "[current element]": true
I use Concat to generate the complete JSON string; the JSON function has "refused to cooperate".
concat('{"appliedCategories":{',join(variables('CategoryItems'),','),'}}')
After we receive the etag, we can use the Graph API to update the Planner task:

By means of a patch, the categories are added to the task
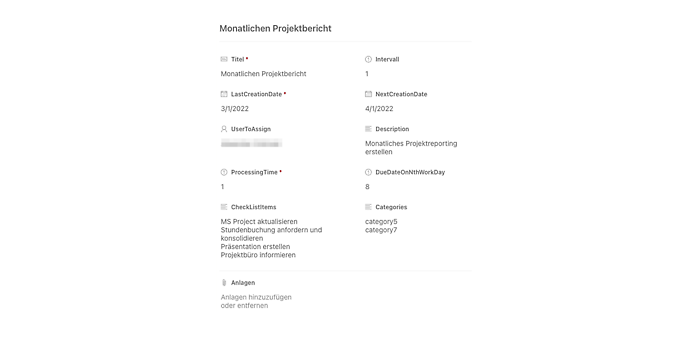
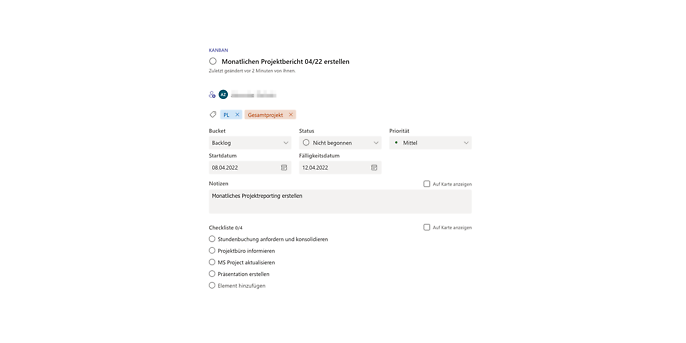
To finish off, here’s a sample entry from the SharePoint list and the task that was generated in Planner:

By means of a patch, the categories of the task are added

Created Planner Task
Conclusion
With its Power Platform, Microsoft has succeeded in creating a powerful, intuitive low-code platform. In addition to countless automation tasks, it can also implement use cases that are not natively supported by Office 365, such as recurring Planner tasks. If the connectors are not able to meet your requirements, the Graph API offers a wide range of methods to do pretty much any task relating to Office 365. The platform is well-designed and well-engineered, making it great for testing and troubleshooting.
Would you like to learn more about exciting topics from the world of adesso? Then check out our latest blog posts.
Also interesting


