24. November 2023 By Franziska Scheeben and Milena Fluck
The Jest testing framework: our top five features
Is writing unit tests in Jest part of your everyday routine? If you are already familiar with Jest, then you are probably adept at using all the basic functions. But when was the last time you really took the time to explore Jest and all the great features it has to offer? We might just have one or two features up our sleeve that you were previously unaware of that will make your daily work easier.
If you are new to Jest, that is not a problem. We will explain everything that this testing framework has to offer. Who knows? You just might find one or two handy features that will give you a reason to try out Jest in the future.
Whether you are a Jest professional or someone who is curious and just getting started, here is a basic overview of Jest.
Jest is a JavaScript testing framework from Facebook that supports many languages and frameworks, including TypeScript, Node.js, React, Angular and Vue. According to State of JavaScript (https://2022.stateofjs.com/en-US/libraries/testing/), Jest has ranked top five amongst JavaScript testing tools in terms of retention, interest, usage and awareness since at least 2017.
In some build tools like Nx, the Jest setup is already included in the standard project setup. As an all-in-one package, Jest includes a test runner, which is responsible for test execution, an extensive assertion library to formulate expectations, a mocking library and much more.
Here are our top five features available with Jest:
- The coverage report
- The watch plug-in
- Mocking node modules
- Timer mocks
- Snapshot testing
The coverage report
Has your team defined a quality gate, or do you simply want to know where you currently stand in terms of test coverage? The Jest coverage report provides detailed information on your test coverage. To show a coverage report in the console, you can simply use the --coverage flag when running the test. A table containing information about coverage is now shown in the console. It looks like this:
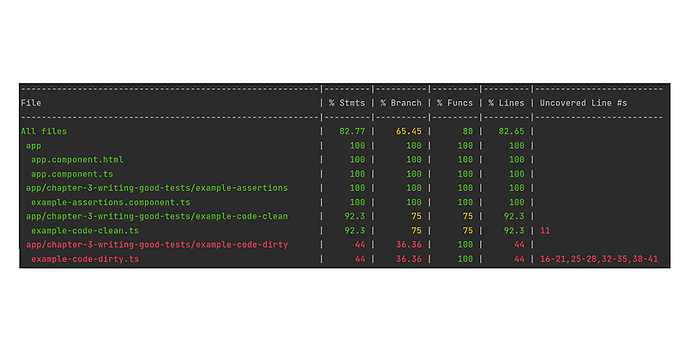
There are different types of coverage. For those of you who do not have much experience with test theory, here is a brief description. Say, for example, every statement has been executed at least once in a 100 per cent statement coverage test, this does not mean that all conditions were checked. In this case, this would be referred to as a branch coverage test. Another type of coverage is line coverage, which specifies the line coverage of all executable source code lines independently of the control flow graph. In the table below, we now see these coverage dimensions along with the accompanying assessment individually and per file.
- % Stmts: Percentage of all instructions that were executed at least once by means of tests.
- % Branch: Percentage of all branches whose conditions were fulfilled at least once by way of tests and thus passed.
- % Funcs: Percentage of all instructions that were called at least once by means of tests.
- % Lines: Percentage of all source code lines that were run at least once by way of tests.
The table can sometimes appear somewhat unintuitive and unwieldy. But this is really not an issue at all, since there is also a solution to this problem. --coverage --coverageDirectory='coverage' is used to create a visually appealing coverage report in the coverage directory of your choosing, or to put it another way, the name 'coverage' is freely selectable. You can now find an index.html file in the corresponding folder, which you can open in a browser.
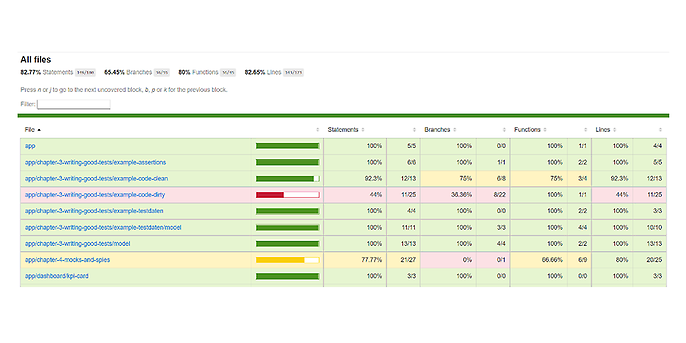
In both views, Jest uses three colour-coded scores to rank coverage: low (red), medium (yellow) and high (green). By clicking on the corresponding file, you also receive detailed information on coverage:
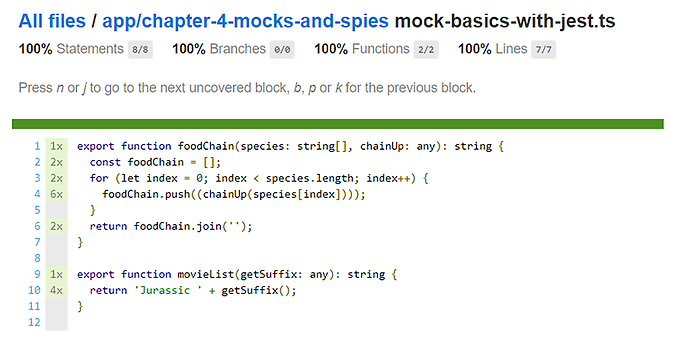
A Jest coverage report provides in-depth insights into test coverage and the various coverage dimensions in your project.
The watch plug-in
Interestingly, Jest comes with a watch mode that makes it possible to get quick feedback on code changes. This is a real plus, because users often want to know whether changes to code might lead to undesirable side effects elsewhere that destroy existing functions. However, running all the tests again takes a lot of time and compute. Jest can now be started with the CLI option --watch to only re-run tests affected by file changes. A somewhat more expansive variant called --watchAll is also available that runs all tests again whenever a change is made.
But there are also other interactions that are possible in watch mode. For instance, specific actions can be initiated using different keys:
- 'f' only re-runs failed tests;
- 'u' triggers an update of all failed snapshots; and
- 'i' launches an interactive mode to update snapshots individually.
But there is more to it than just the built-in keys. If you want to define your own watch mode prompts, you can write your own watch plug-in and connect to Jest events. The following watch plug-in interface is available for implementation:
	export declare interface WatchPlugin {
	    isInternal?: boolean;
	    apply?: (hooks: JestHookSubscriber) => void;
	    getUsageInfo?: (globalConfig: Config.GlobalConfig) => UsageData | null;
	    onKey?: (value: string) => void;
	    run?: (
	       globalConfig: Config.GlobalConfig,
	       updateConfiqAndRun: UpdateConfigCallback,
	    ) => Promise<void | boolean>;
	}
Based on this, the methods ‘apply’, ‘getUsageInfo’ and ‘run’ should be defined in your plug-in. This is simply exported as a module under jest.config.ts after which it is then available.
Implementing the apply() method provides access to the following parts of a test life cycle: shouldRunTestSuite(testSuiteInfo), onTestRunComplete(results) and onFileChange(projects}).
Keys can also be added or existing ones overwritten by default by implementing getUsageInfo(). A key and a prompt must be returned in this. Along with that, there is another option available to you in watch mode.
To then execute something, run() is implemented. If the key is pressed, the plug-in takes control and can use the second parameter updateConfigAndRun to trigger a test run. Parameters that can be changed for this test run include collectCoverage, onlyFailures, testNamePattern, testPathPattern and updateSnapshot. Control is then handed back over to Jest.
If you would like to write your own plug-in, it is best to take a closer look at the guide available in the Jest documentation: https://jestjs.io/docs/watch-plugins.
Mocking node modules
Especially when it comes to unit tests, we want testing to be done in a clearly structured, closed room, because external influences introduce unwanted variances into your test. At the same time, a unit test can cause real damage if it is not carried out in a secure test environment. This could lead to live data being deleted or modified or actual requests being sent. A standardised, secure mocking concept saves developers from unpleasant and risky situations. The following generally applies in relation to tests: do not test anything you cannot change. It can therefore really make sense to exclude entire node modules (such as lodash) directly from your tests and stub or mock them globally.
In practice, a subdirectory called __mocks__/ is created immediately adjacent to the node_modules directory. Please note here the subdirectory must have the identical name and that built-in node modules are not automatically mocked and must be explicitly called using jest.mock('fs’) – the filesystem (fs) is one such built-in module. This seems unintuitive at first, since imports are written to test files before mocks. But what happens if an import wants to use a module that has actually been mocked before it has even had a chance to call up the mock? Fortunately, Jest hoisting is there to help. With it, your jest.mock calls precede all imports, even if this is not immediately apparent based on the reading order.
You can now mock all node modules globally in this __mocks__/ directory.
One downside of manual mocks is, of course, that you may have to modify them if the original module changes. An automatic mock is therefore created using jest.createMockFromModule, and you can overwrite the default at the locations where it is relevant for you. This is also the strategy recommended by Jest.
You can find a number of great examples along with further information in the Jest documentation at https://jestjs.io/docs/manual-mocks. It is definitely worth considering this option and defining a standardised mocking strategy for node modules before any developer handles them themselves in the project and individually in each test. Or worse yet, they do not stub or mock at all.
Timer mocks
Have you ever had a test fail because there was a setTimeout() somewhere in the code and things you expected in your test simply had not happened yet? Either you manually mock timer functions and consider whether the test is actually useful, since the mock implementation runs the code immediately. Or you can also use the timer mocks from Jest. For example, the simple call of jest.useFakeTimers() can replace any timer function (setTimeout(), setInterval(), clearTimeout(), clearInterval(), etc.). Since jest.useRealTimers() restores all timers, timer functions can be flexibly switched on and off within a test file, test suite or even within a test.
If in some cases it is important that the test checks whether a call has really been executed after a certain time, it is possible to use jest.runAllTimers() to fast-forward ahead until all timers have been executed. This makes it possible to check in the test code right afterwards to make sure that the call has been made. However, you can also define even more specifically how far ahead the time is fast-forwarded. If you use jest.advanceTimersByTime(x), the timer is fast-forwarded by exactly x milliseconds. All timers that would be executed during this time are run immediately. It is also possible to define that certain timers are explicitly not to be faked by passing a configuration containing the functions that are not to be faked to the aforementioned useFakeTimers().
But beware. There is a trap here. If the code contains recursive timers, jest.runAllTimers() leads to an infinite loop. Jest however intercepts the loop at some point and throws an error. Despite that, it is better to check the code for recursion first, seeing as it is not cancelled until 100,000 timer runs have been executed. To avoid this issue, jest.runOnlyPendingTimers() can be called in the test instead.
For more information on timer mocks, refer to the Jest guide, which you can find at https://jestjs.io/docs/timer-mocks, and in the fake timer API documentation at https://jestjs.io/docs/jest-object#fake-timers.
Snapshot testing
A snapshot is exactly what you would think it to be. In other words, it is the representation of an object at a specific point in time, which we expect to have a specific appearance in a test. In the end, we also test a snapshot in simple expectation definitions such as expect(actualNumber).toBe(expectedNumber), since the variable actualNumber is expected to have the value expectedNumber at this point in time. This line of code is easy to formulate, and it is easy to understand what is expected. And because of that, it is also clear what the problem is when the test fails. So why does Jest also offer a function called snapshot testing?
It really becomes interesting when the most popular matchers (such as the .toBe() mentioned above) reach their limits. This happens when we expect complete UI rendering results. Basically speaking, the aim is to ensure that an expected result is received after a certain data input at the html structure level. If one were to manually insert a complete, most likely exceedingly long, string that is expected, it would typically take quite a bit of time and lead to a difficult-to-read code. If this had to be edited, it would be very difficult to identify the part that is changing and adapt it correctly. To be able to carry out such tests in a way that does not take too long and is easy to maintain, Jest provides the matcher .toMatchSnapshot(). This could look something like the sample code below:
	it ( name: 'should render kpi card with difference', fn: () => {
	  kpiCardComponent.component.title = 'Besucher';
	  kpiCardComponent.component.value= 10000000;
	  kpiCardComponent.component.difference= '10%';
	  kpiCardComponent.detectChanges();
	  expect (kpiCardComponent.element).toMatchSnapshot ();
	});
Jest uses a test renderer that saves the snapshot result in a file during the first test run. To do this, a folder called __snaphots__ is created at the test file level. A file with the name of the test file plus the extension .snap is added to this folder. This is what it would then look like in the project directory:
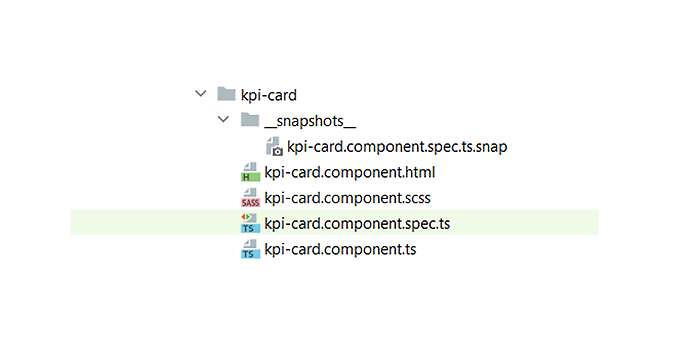
This is a simple text file that contains the description and the exported comparison value for each test. This could look something like this:
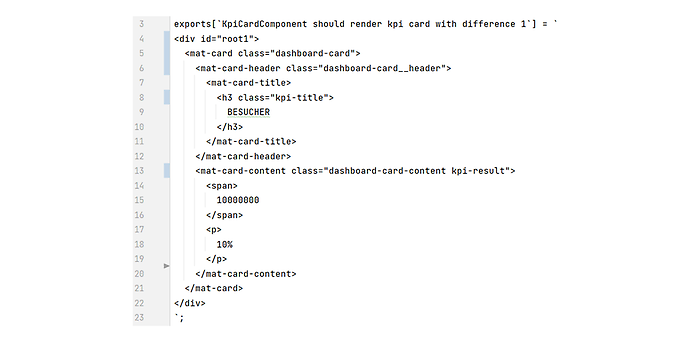
During each subsequent test run, the generated output is compared with this to determine whether there have been any unwanted changes. As you can see above, the test code remains lean with one line (expect(actualHtml).toMatchSnapshot()), and no extra work is required to generate the desired result.
If the test fails because the results of the comparison are negative, Jest highlights the location of the deviating code in the output. If desired changes take place and the reference snapshot needs to be updated, Jest can be launched using the -updateSnapshot flag. It is important that the snapshot file is committed and is part of your code review. Jest also provides a helping hand here, as the snapshot is automatically formatted so that it is easy to read for humans.
If you do not want the expected snapshot to be stored in a separate file, there is another option available. The Jest maker .toMatchInlineSnapshot() also compares a snapshot, though the snapshot is written directly into the parameter bracket of the matcher the first time it is run. This may result in the test file being very long, though the actual and target values can be read one after the other. Either way, it makes sense to agree on a path in the project to ensure that everyone can locate the snapshot quickly. In both cases, the code reviewer needs to make sure that the snapshot has been generated and committed in the file or inline.
For more information on snapshot testing refer to the Jest documentation which you can find at https://jestjs.io/docs/snapshot-testing.
Conclusion
Choosing the right testing tools is certainly not easy. Instead of compiling your own test stack with a mocking and assertion library, potentially a watch plug-in, a coverage report tool and a test runner, Jest offers the all-inclusive comfort package. The aim of this blog post is not to describe the pros and cons of Jest as a testing framework. However, if you decide to deploy an external framework that is developed and offered by a large company like Facebook, you should also make sure you know all the benefits it has to offer and take advantage of them if they could be of use to you.
In our blog post, we have listed our personal top five Jest features that you may not have discovered for yourself yet. We hope you have lots of fun trying them out for yourself.
Would you like to find out more about exciting topics from the world of adesso? Then take a look at our previous blog posts.


